 |
|
 |
| View previous topic :: View next topic |
| Author |
Topic : "Advanced photography tips" |
Lunatique
member
Member #
Joined: 27 Jan 2001
Posts: 3303
Location: Lincoln, California
|
 Posted: Wed Mar 15, 2006 12:14 am Posted: Wed Mar 15, 2006 12:14 am |
 |
 |
At the request of inquiring minds.
Most of the tips I can give are readily available on the internet in the various photography websites. A simple google search will turn up more hits than you could read and absorb in a week, so that's a lot of stuff already (not to mention available books) I guess I could write about some of the important ones that's made the most dramatic impact for me personally--some of these are tips for pro work, so might not necessarily be that useful unless you're doing pro work--but then again, good photography is good photography, regardless of if you make money with it or not. A lot of the stuff I learned on pro gigs helped my personal photography--even when just shooting family and friends at parties. I'm not going to talk about any artsy stuff--just techniques, as the artsy stuff is highly subjective. For some, shooting a dirty wall gets them off, for others, it's shooting their pets and children. Ok, on with the tips.
- If your camera shoots RAW files and they aren't too much of a burden on your camera/memory cards, then use RAW. They are far superior to jpeg or any other format because RAW files are like digital negatives that gives you a lot of room for tweaking without image degradation. You can change the white balance setting, exposure compensation, color profile, tone curve..etc--all after the picture has already been taken. It's like extra insurance. Of course, if your shot really sucked to begin with, then no amount of tweak will save it.
- Don't turn your nose up at post processing. ALL professional commercial photographers do it, except that they are so good at it you can't even tell that it's been heavily processed. Bad post processing work is what gives it a bad name. If you really know what you're doing, your photos will look better without looking like fake/overprocessed crap that we see so much of.
- The smallest amount of changes in lighting ratios/levels can totally change the feel of a photo. Take these ones I did for a restaurant for example:


When you have very specific needs in lighting, it gets hairy real fast as you have to do your best to create the kind of look you have in your head. Controlling the lighting ratio is really hard, but with digital photography it's far easier than film because you could see the result right away. One of the tricky parts of food photography is to place the highlight in just the right spot so that it showcases the texture of the food, while not obscuring important details. The rice was very hard because too much light will over expose the white of the rice and you lose the detail of the individual grains. But, you want the rice white enough so that it looks tasty. I had to put a snoot on exactly where the rice is on the right, or else it'll under expose. On the left I have a golden reflector so it gets some warmth into the shot. The chicken and the beef--because there's oil and liquid on both the subject and the decorative elements (greens), you have to turn them just right so that you don't get unwanted glaring highlights. This is a very important part of commercial photography. If you look at perfume ads, soft drink ads, wine ads..etc, you'll notice that they always place the reflected highlight of the light source in areas that don't obscure the label of the product, or create unflattering harshness. In commercial photography, every tiny detail has to be thought of. Small but clever tricks like cutting a piece of white paper and placing it behind a wine bottle to show the color of the wine better, using a used coffee filter over a light for just the right amber color, stretching a certain colored pantyhose over a certain part of the lens to create a certain look, or stretching a pantyhose over just the right part of the light to kill unwanted glare on the forehead of the subject...etc--all tricks of the trade.
Here's another tip that's made a huge difference in my photography--clever use of fill flash. I talked about it already earlier, but I'll show you examples here:


http://www.ethereality.info/ethereality_website/about_me/blog_pics/2006/01~02_states_trip/family&friends/family-restaurants-01.jpg
You probably can't tell that a flash is used in these shots, because I intended it to look as natural as possible--maintaining the lush, warm atmosphere of a bedroom or restaurant that made me want to take the shot in the first place. If I had used flash the way most people do, these photos would've been completely destroyed by harsh, washed out, pale flash lighting. I dialed the power of my flash down by about 2 exposures--just enough power so that the subjects didn't fall into total darkness, while I upped the ISO to around 800 so that it sucks in enough ambient light to capture the atmosphere as it really were in the environment. In the first shot I had bounced the flash to the wall directly to my left to make it less direct, and I had a homemade TUMS anti-acid tablet bottle slipped on the flash to bring more flash to the front. In the second shot it was bounced to the ceiling, but with a Lighsphere II diffuser on to bring a bit of flash back to the front. In the third and fourth shot, the flash is more prominent and bounced to the ceiling, but mixed in with the ambient light so that it brightened the subjects without looking harsh. All four shots would've been a mess of dark shadows if I had not used a fill flash.
Here's another example, shot outdoors, in the middle of a street at night:

If I didn't fire the flash, she would've blurred like hell because of the lack of lights. I used the same technique--low flash, higher ISO--so that I capture the ambient lighting, but lit the subject just enough so that she still looked natural. This one was a direct flash, since I had nothing to bounce off of.
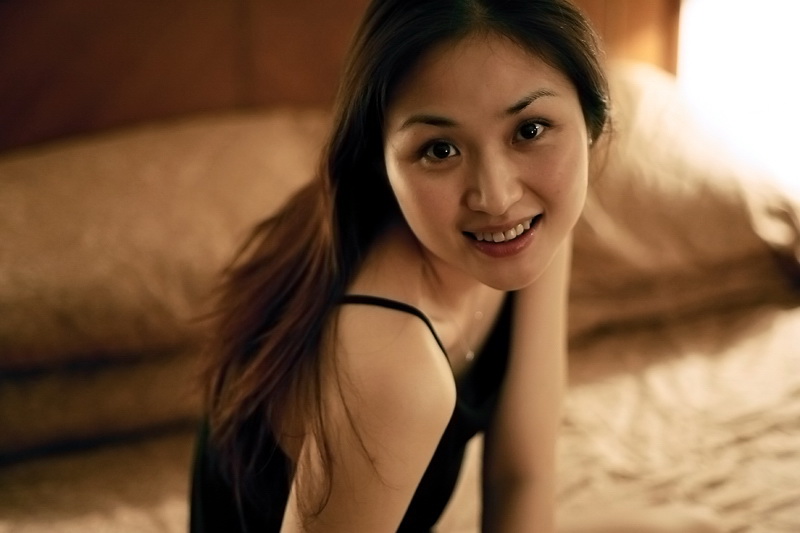
Here's an example of not having fill flash and having it:


The shot without the fill flash--if that room had been any darker, then the shadow side of her would've been totally dark, and while that can be the style in itself (the dark shadows with only rim lighting), if you wanted the scene to be more balanced out, you'd have to use fill flash or a reflector.
Of course you could take indoor low-light photos without a flash, but you have to know how to place your lights or subject, and you should probably have a camera that can do high ISO without a lot of noise. If not, then you need to hold your camera VERY steady (as with your subject as well--be as still as a mannequin). This shot was taken in a hotel room, using only the lamps in the room (we all know hotel room lamps are not very bright). There was a mirror on the other side of the room (and you can see the reflected lamps in her eyes, which is reflecting the mirror):
You can also use available window light for a moody look. This shot benefitted from having a colored curtain, as it added color variation to the shot.:
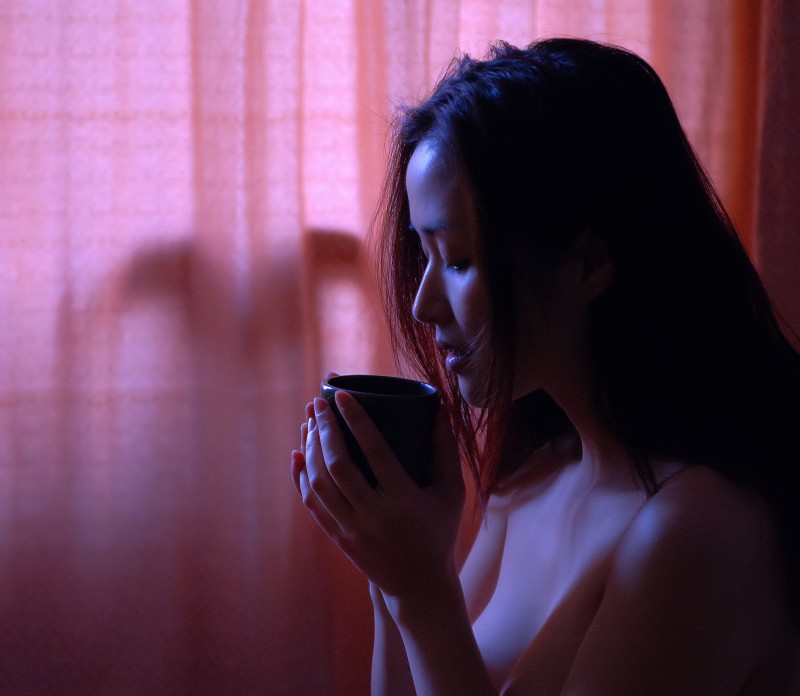
I took this shot with the intention of capturing the color combinations around her, not really because of her. I saw the blue, the yellow, and the orange colors around her, and I just had to take the shot. This is one of the best parts about playing the hunter--you get nice surprises that you never would've thought up yourself:

Replace all lights if you have to. These two shots were for an architectural visualization firm's brochure, showing their receptionists. The lighting fixtures in the receptionist's area created very unflattering and ugly lighting--I had to completely fabricate it all from scratch. Every ounce of lighting in the shots were from my lighting rig--a purple on the right, a yellow on the left, and a softbox in the middle.


And sometimes, only pro gear would work. I needed very soft and flattering lighting for this jewelry catalog, and nothing but my softboxes would've done the job, unless I wanted to fuss around with very high powered hot lights and elaborately setup with homemade diffusers and panels for spill control. Pro lighting gear makes it all almost painless.

Behind the scenes shots. Notice my crappy homemade backdrop--no room for a pull-down rig (ceiling too low): 

Although this might look simple--two softboxes to either side and a reflector on the bottom--trust me, it isn't. Just finding the right ratio/angle for the two lightboxes was hard--because a tiny bit of difference in ratio would change the feel of the shot a lot. If I wanted to get even fancier, I could've added additional lighting with snoots or honeycomb grids and put them on the jewelry so they are futher emphasized, but the jewelry designs are pretty low-brow, so you can't get too facy or else you misplace the market bracket the product's supposed to be in. For example in fashion, there are first, second, third tiers of market, and when shooting for a certain tier, you have to either tone down or jack up the elegance/lighting style to fit the market.
Anyway, I'm still learning myself, and there's plenty of room for improvement. I'm at the point where I feel I'm competent enough for certain types of pro work, but for really highend stuff, I'd need a well-stocked studio and more experience.
Last edited by Lunatique on Thu Mar 16, 2006 7:44 pm; edited 2 times in total |
|
| Back to top |
|
Impaler
member
Member #
Joined: 02 Dec 1999
Posts: 1560
Location: Albuquerque.NewMexico.USA
|
| Posted: Wed Mar 15, 2006 1:18 pm |
|
|
Great post, lunatique. I hope you don't mind my barging in here, but there were a few things I wanted to add and some things I felt needed some clarification.
| Quote: |
| The smallest amount of changes in lighting ratios/levels... |
I thought this might confuse some photographers who are less familiar with lighting techniques. What lunatique is talking about here actually has a twofold definition.
First, lighting levels (subject brightness range) refers to the overall contrast present in a scene. This is measured by the number of stops difference between the brightest highlight and darkest shadow in a scene. To measure this, you're going to need a camera with either shutter or aperture priority (check your manual or dpreview if you're not sure). Let's say that you set your shutter speed to 1/60. The camera indicates that the "correct" exposure for the highlight is f 16, and the "correct" exposure for the shadow is f 4.
This represents a five stop subject brightness range:
f 16
f 11
f 8
f 5.6
f 4
Inversely, if you read 1/60 at f 16 for the highlight and measured shutter speeds, you would find that your shadow would read 1/4 at f 16.
Average Contrast (detailed shadows and highlights) - 5 stops
High Contrast (less detail in shadows and highlights) - More than 5 stops
Low Contrast - Less than 5 stops
Contrast ratio, as it is called in portrait and product photography, is very similar to subject brightness range, except that it refers to the subject only. Basically, if the lit side of your model's face reads 1/60 at f 16, and the shadowed side reads 1/60 at f 8, the relative brightness is two stops. Two stops difference means four times as much light, so your ratio is 4:1. One stop difference is 2:1, 1.5 stops is 3:1.
Control your contrast!
So, great. You've got a contrasty scene. Now what? You have a few options at hand.
It's easier if you're using artificial light. First off, some definition. Your key light is the main light source, the light that illuminates most of your subject. It's the brightest light, and it should usually be the "set it and forget it" light. You calibrate all your exposure and secondary lighting around this. Your fill light is the second light or reflector (usually not as bright) that you use to fill in shadows (get it?) when they're too dark. There are more types of lighting (background, hair separation, specular, tent, blah blah blah), but we'll just talk about the two for simplicity's sake.
Now, the easiest way to reign in the contrast is to simply fill in the shadows. In this instance, you'll be exposing for your key light. Be careful to not make your lighting too flat (for instance, a 1:1 lighting ratio); without some tonal separation your photo will look like a mug shot.
You can also turn your fill light off and expose for your shadows. In this instance you would ramp down the brightness of your key light. This method is trickier, and you should only use it if you have some naturally beautiful shadows that your fill light would destroy.
Now, any photographer will tell you that you need bright lights. This is misleading, but true. It's easy to make a bright light dimmer, but it's almost impossible to make a 30 watt bulb shine like a 200 watt. In reality, most of the time your lights will be turned down to half power (or less). Anyone remember high school physics? If you do, you'll remember the Inverse Square Law. This law holds that the strength of a light source is inversely proportional to the square of the distance between subject and source.
Intensity = 1/Distance^2
Let's say that your subject is properly illuminated at 10 feet. At 20 feet, he would receive 1/4 of the light, meaning he would be two stops underexposed. Most photographers don't have 20 feet of studio space to move their subjects or lights around, so they turn them down. It's much easier to move a few feet or inches back for subtle differences in brightness than 20 feet.
The Inverse Square Law comes into play more often than one would think in photography. For instance, when bouncing a flash, it's important to increase exposure since your light has to travel two or three times further. When you illuminate someone with an unbounced flash, it's important to place them close to a background. If your subject is 3 feet away from you and you're 6 feet away from a wall, you guessed it! Your background will be two stops underexposed. Depth of field also obeys the Inverse Square Law, but I'll try to explain that some other time.
This actually brings me to another thing that Lunatique mentioned:
| Quote: |
| I used the same technique--low flash, higher ISO |
What lunatique is talking about here is a very useful technique for accurate flash exposure. I'd just like to present perhaps a more simple technique (or at least one with fewer variables) for newer photographers or those using a film camera. Traditional flash exposure is controlled by aperture. You would leave your camera at 1/60 and then ratchet the stops up or down depending on subject distance and the guide number. So, keeping that mind, let's say that we had a proprerly illuminated subject at 1/60 f 8 at 6 feet away. She looks great, but the background is too dark. In this case, meter your background. Let's say that a proper exposure would be 1/4 at f 4. Your final exposure would then be 1/4 at f 8. A 1/4 second exposure will properly expose your background (actually, it will be slightly underexposed, but this will help with tonal separation), while f 8 will still leave your subject nice and pretty.
So why did lunatique mess with ISO? Mostly, he didn't want to lug around a tripod. Remember that for every step up in ISO, that's also one stop exposure increase for the same shutter speed. Your guide number also increases by a factor of 1.4 every time. Let's say again your exposure is 1/4 at f 8 at ISO 100. At ISO 200, it would be 1/8 f 11. ISO 400, it would be 1/30 f 16.
So, then, why did he mess with his flash brightness? Again, he didn't want to lug around a tripod, but it also kept his apertures small. Notice how the apertures kept increasing every time he turned up his ISO? That's because it was making his flash brighter to the camera. So if he turns his flash down to, say, quarter power with a ISO 800, that would mean he could make a handheld exposure at 1/60 f 2. It's easy to see how quickly this could get complicated, so start with two variables: shutter speed and aperture.
_________________
QED, sort of. |
|
| Back to top |
|
Lunatique
member
Member #
Joined: 27 Jan 2001
Posts: 3303
Location: Lincoln, California
|
| Posted: Wed Mar 15, 2006 7:50 pm |
|
|
Impaler's post probably scares some of you--I know for me initially, all the technobabble about the mathematical formulas made my head spin. You don't have to sit there with a calculator--this stuff will all make sense when you think about it while shooting and observing your camera's settings.
And yes, I hate lugging around a tripod. I'm a very physical photographer--I'm all over the place when I shoot. A tripod just kills me--unless I'm shooting some serious landscape or product/still life. Also, when shooting anything that moves, you need to have the shutter fast enough or you'll get motion blur (unless that's what you intended), so jacking up the ISO helps a lot (but you introduce color noise/coarse grain--which fortunately, Canon cameras are great at eliminating). The duration of a flash is also very short, so using any kind of fill flash also helps to freeze the action. Some cameras have settings for slow sync or second curtain sync--which is similar to the technique I use, but unless the camera has high ISO feature to begin with, simply using slow sync will give you a blurred ghost image caused by the slow shutter speed, and then a sharper double image from the flash. Not exactly something you want all the time except for a few kicks and giggles when shooting in a club or something. |
|
| Back to top |
|
Impaler
member
Member #
Joined: 02 Dec 1999
Posts: 1560
Location: Albuquerque.NewMexico.USA
|
| Posted: Wed Mar 15, 2006 8:44 pm |
|
|
Heh, I just realized that I "clarified" single sentences with multiple paragraphs full of numbers. I'll shoot some illustrative photos tonight or tomorrow. Hopefully then it'll look less like a technical manual/physics lesson/math quiz. 
_________________
QED, sort of. |
|
| Back to top |
|
B0b
member
Member #
Joined: 14 Jul 2002
Posts: 1807
Location: Sunny Dorset, England
|
| Posted: Thu Mar 16, 2006 6:18 am |
|
|
with a well exposed picture and some nice glass you won't notice the grain from film ISO upto 800 on most DSLR's its only when you start messing with the levels that you'll bring the grain out..
even @ 1600 this picture is passable as a print..

most photographers will underexpose a shot when shooting RAW and then adjust when they post process.. |
|
| Back to top |
|
Impaler
member
Member #
Joined: 02 Dec 1999
Posts: 1560
Location: Albuquerque.NewMexico.USA
|
| Posted: Thu Mar 16, 2006 3:13 pm |
|
|
I'm fresh out of beautiful asian women, so you'll have to bear with my scruffy mug for the time being to make my point.

This is a photo with a very high subject brightness range. The sky would correctly expose at 1/500 f 8, while the shadowed area would require a 1 second exposure at the same aperture. Altogether this represents a 10-stop dynamic range, making it high contrast:
1/500
1/250
1/125
1/60
1/30
1/15
1/8
1/4
1/2
1

This is a photo with average contrast range (5 stops).

Similarly, this photo has low contrast (3 stops).

This photo is slightly underexposed, but it will do for now. The difference in exposure between the lit side of my face and the shadowed side is 1.5 stops, which represents a contrast ratio of 3:1.

Let's move back out a bit and into color. The background is nicely lit, but our gorgeous model is half-hidden in shadow. We would fix this with our flash:

Now I'm well-lit, but my background is dark. This lends the picture a crummy snapshot look, e.g. every single picture on myspace. So, first we meter our background and find the proper exposure:

Now, mix in one scruffy white kid.. and...

Now, the flash is still there in this picture, but it's less noticable because the background is properly exposed. I could have gotten away with a shorter shutter length if I had bumped up my ISO, but I was using a tripod for all of these shots.
Hopefully these help clear up my above post.
_________________
QED, sort of. |
|
| Back to top |
|
B0b
member
Member #
Joined: 14 Jul 2002
Posts: 1807
Location: Sunny Dorset, England
|
| Posted: Thu Mar 16, 2006 3:59 pm |
|
|
the laymans use of apature, shutter speed and ISO
hand held? rule of thumb says: shutter speed should equal or exceed ur focal length for a sharp shot, if you have steady hands then you can get away with lower shutter speeds.
do you want more of your picture in focus? then you need a smaller apature f8, if the available light doesn't let you set the shutter speed to your focal length then you need to bump your ISO until it will - or use flash..
do you want to concentrate on a subject in your picture to help isolate it from the background? then you need a larger apature f2.8/1.8 (if your lens will allow it) this will allow you to keep a higher shutter speed without the need to bump your ISO too high..
are you taking a picture of a landscape on a tripod? then you'll want to keep your ISO to 100/50 and have a very small apature (f16/22) with a long shutter to compensate for the lack of light coming in through the lens.
motor sport:
Cars - you'll want to have a shutter speed of approx 1/200-1/250 to help capture the sense of movement, have your shutter speed too high and you'll run the risk of having the vehicle frozen in the picture, not a good shot..
Bikes - because the spokes on the wheels are larger than the gap in the alloys on a car / bolts holding the wheel on you need to have a lower shutter speed 1/180 or so so the wheels don't look frozen again eliminating the sense of speed.
Aircraft with blades - again if you have the shutter too high then you'll get prop freeze which like on a bike/car will eliminate the fact that the aircraft is moving rather than hovering in the air. the speed of the shutter all depends on how fast the aircraft is flying so anything from 1/160-500 selecting the lower end if your shooting a helicopter a high shutter speed will get some of the tail rotor blur but the main rotors will look frozen..
General Sports - depends on how you want your shot to turn out lots of movement 1/125-1/180 frozen action 1/320+
- i recently took some pics @ a taekwon-do competition - a first for me shooting indoors with poor lighting - i was shooting @ 1/90 and got some shots that i was pretty happy with the sense of movement was gr8, but i came away with a lot of throw away shots and had i increased my ISO to 1600 i may well have gotten alot more keepers.. i've since bought a 20D so the higher ISO's will be alot better than with my 300D |
|
| Back to top |
|
Lunatique
member
Member #
Joined: 27 Jan 2001
Posts: 3303
Location: Lincoln, California
|
| Posted: Thu Mar 16, 2006 7:48 pm |
|
|
| Maybe the guys who asked for photography tips should post specific questions here so we could answer them? It's kind of silly that we are posting stuff without knowing what kind of stuff you guys want to know. |
|
| Back to top |
|
[Shizo]
member
Member #
Joined: 22 Oct 1999
Posts: 3938
|
| Posted: Fri Mar 17, 2006 12:05 am |
|
|
| Impaler wrote: |
Now, the flash is still there in this picture, but it's less noticable because the background is properly exposed. I could have gotten away with a shorter shutter length if I had bumped up my ISO, but I was using a tripod for all of these shots. |
In that picture, is flash less strong than on the previous shot? Because on 1/60 and 0.8 the flashed face looks the same. |
|
| Back to top |
|
B0b
member
Member #
Joined: 14 Jul 2002
Posts: 1807
Location: Sunny Dorset, England
|
| Posted: Fri Mar 17, 2006 1:54 am |
|
|
theres a 2nd light source in that last pic shizo so the flash doesn't show so much, its like fill in flash - like impaler said the background now has the correct amount of light for exposure so isn't so noticable, if it wasn't for the fact the flash can be seen in his eye's you'd be none the wiser that it had fired without looking at the exif infomation.
usually fill in flash is used when taking a pic of something/someone when theres a strong ligh source behind, meaning that without the flash the subject facing you would be in shadow, if you metered for the subject rather than the surrounding light then you'd have a blown out baackground like in the 1st pic, this is all well and good if you're going for an arty shot, but if the surrounding area is important to you ie. you're on holiday and wanted to show your GF/Wife/Kids standing next to a statue or monument and the sun was behind and the camera metered for the surrounding light rather than the people standing in shot then they'd come out dark in the picture, but by popping the flash you'd have an exposed background as well as being able to see the smiling face(s) of your GF/Wife/Kids  |
|
| Back to top |
|
Max
member
Member #
Joined: 12 Aug 2002
Posts: 3210
Location: MIND
|
| Posted: Sun Mar 19, 2006 1:45 am |
|
|
Amazing infos guys! Thanks alot for taking the time to share all your knowledge.
The technical stuff sounds funky |
|
| Back to top |
|
Ragnarok
member
Member #
Joined: 12 Nov 2000
Posts: 1085
Location: Navarra, Spain
|
| Posted: Tue Mar 21, 2006 3:29 am |
|
|
Great topic, it's a really nice read
Most of my shots lately are landscapes, so shooting with natural light without helping lights is my main concern right now. Also, I'm having problems with night shots, usually take 2-3 shots of the same subject due to uncertain exposure (my camera doesn't read well the exposure).
Thanks again for posting all this info
_________________
"Ever forward, my darling wind." -Master Yuppa
Seigetsu |
|
| Back to top |
|
|
|
You cannot post new topics in this forum
You cannot reply to topics in this forum
You cannot edit your posts in this forum
You cannot delete your posts in this forum
You cannot vote in polls in this forum
|
|
Powered by phpBB © 2005 phpBB Group
|


